AACのLiveDataのsetValueとpostValueの違いについて
コードを追ってみた
val liveData:MutableLiveData<String> = MutableLiveData<String>()

fun useSetValue() {
  liveData.value = "aaa"
}

fun usePostValue() {
  liveData.postValue("aaa")
}
setValueの方はどうやらMainThreadでしか使用できないらしい。
確かにコードを実際に見てみると
setValue
    @MainThread
    protected void setValue(T value) {
        assertMainThread("setValue");
        mVersion++;
        mData = value;
        dispatchingValue(null);
    }
postValue
    protected void postValue(T value) {
        boolean postTask;
        synchronized (mDataLock) {
            postTask = mPendingData == NOT_SET;
            mPendingData = value;
        }
        if (!postTask) {
            return;
        }
        ArchTaskExecutor.getInstance().postToMainThread(mPostValueRunnable);
    }
assertMainThread("setValue"); ここでMainTheadによる実行なのか確認して、エラーを出していた
どちらを使うべきなのか?
synchronized (mDataLock) {
            postTask = mPendingData == NOT_SET;
            mPendingData = value;
        }
実際にこの部分がどれだけコストが高いかによるが…
MainThreadで実行されることが確実なのであれば、setValueを使えばいいし、逆にどのThreadで実行されるかわからない場合(特段指定してない場合)などはpostValue使うのが安全だよってことで
androidのdatabindingで書かれているxmlで&&(その他logic operator)を使いたいとき
下記対応表 | operator | 変換後| |----------|-------| | & | & | | < | < | | > | > | | " | " | | ' | ' |
<EditText
android:id="@+id/edit_mail"
android:text="@={mail}"
/>
<Button
androidtext="保存"
android:enabled="@{mail.length > 0 && isEmailValid(mail)}"
/>
【memo】Android StudioでUnitテストが実行できないときのチェック項目
Preferences > Build, Execution, Deployment > Compiler

Configure on demand のチェックが外れているか確認する
unused resourcesがapkに含まれるのかどうか確認する
概要
tools:hogehoge = とかで指定しているものもapkの中に入るのかな?
— atsumo (@atsumo) July 23, 2018
実際にはlocalのリソースではなく、ネットワーク経由で画像取得したいときなど、 レイアウト調整のときにサンプルの画像を表示したほうがわかりやすいのでtools属性にsrcに設定していた。 レイアウト調整のときのみに使用するが、実際にプロダクトでは不要なリソースがbuild時に削除されているのか気になったので調べてみた。
調査
image_003_unuse.pngをサンプルデータとして使用
下記toolsとして設定してる検索結果

実際にapp-debug.apkをbuild -> apk をzipに変換
結果
zipの中身を確かめる
zipinfo app-debug.zip | grep unuse
-rw---- 2.4 fat 191359 b- stor 80-000-00 00:00 res/drawable/image_003_unuse.png
入ってる...
Android StudioのBuild > Analyze APK... でも確かめてみた

tools属性への設定をやめたらどうなるか?
tools属性に指定していた部分を削除した

新しいapkを作成後 Build > Analyze APK...をもう一度実行

入ってる...(二度目)
メモ
imageを参照した時点でR.javaにResIdが生成されるから、その時点でもうリソースとして考えられるってことかな?
aabビルドするとリソースをうまく端末に適したものとして提供してくれるようになるが、とわいえ今回みたいな事例だとそれに対応しないだろうということで使ってないものは消さないとなっていう結論
github.com konifarさんのunuesd_resourcesを削除するgradleも便利なので貼っておきます。
勇者を育てるMotionLayout ver1
基本理解
公式リファレンスより
This Layout supports transitions between constraint sets defined in MotionScenes A MotionLayout is a ConstraintLayout which allows you to animate layouts between various states. Note: MotionLayout is available as a support library that you can use on Android systems starting with API level 18 (JellyBean MR2). MotionLayout links to and requires a MotionScene file. The file contains one top level tag "LayoutDescription"
- ConatraintLayoutのサブクラスで、
MotionSceneで定義された開始と終了のconstraintの間を保管してくれるlayoutである - MotionLayoutの
app:layoutDescriptionにMotionSceneを定義したfileを設定する - API level 18から使用可能
基本設定
- Android Studio 3.1.3以上
- Android API level 21以上
セットアップ
app/build.gradleの設定
dependencies {
    ...
    implementation 'com.android.support.constraint:constraint-layout:2.0.0-alpha1'
}
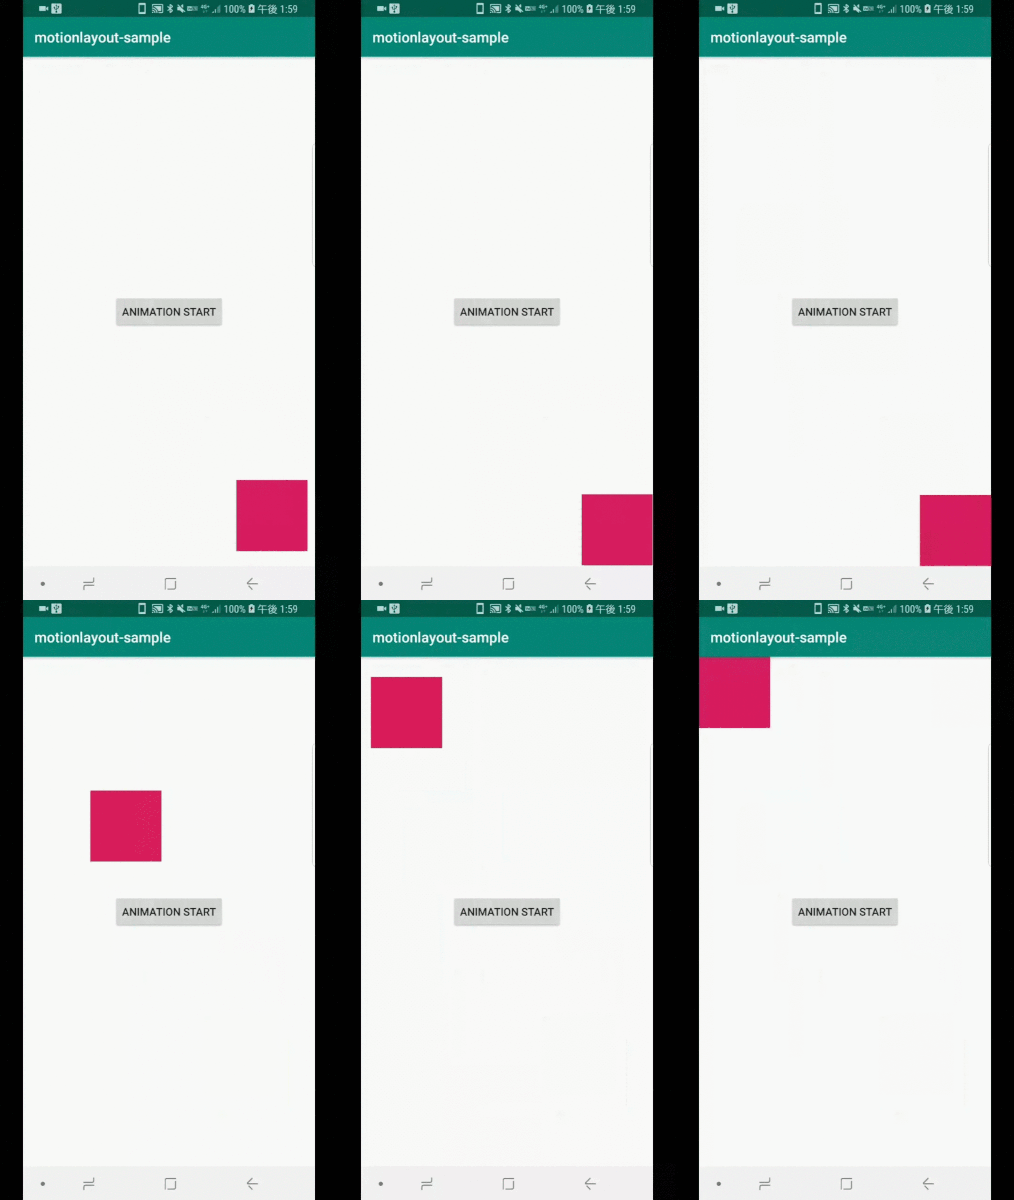
サンプル

コードはこちらに上がってます。GitHub - atsumo/motionlayout-sample: motion layout sample code
MotionLayout
Sample1Activity.kt
package com.github.atsumo.motionlayout_sample

import android.support.v7.app.AppCompatActivity
import android.os.Bundle

class Sample1Activity : AppCompatActivity() {

  override fun onCreate(savedInstanceState: Bundle?) {
    super.onCreate(savedInstanceState)
    setContentView(R.layout.activity_sample1)
  }
}
activity_sample1.xml
<?xml version="1.0" encoding="utf-8"?>
<android.support.constraint.motion.MotionLayout
    xmlns:android="http://schemas.android.com/apk/res/android"
    xmlns:app="http://schemas.android.com/apk/res-auto"
    xmlns:tools="http://schemas.android.com/tools"
    android:id="@+id/motion_container"
    android:layout_width="match_parent"
    android:layout_height="match_parent"
    app:layoutDescription="@xml/scene_01"
    tools:context=".Sample1Activity"
    >

  <Button
      android:id="@+id/button"
      android:layout_width="wrap_content"
      android:layout_height="wrap_content"
      android:text="Animation Start"
      app:layout_constraintBottom_toBottomOf="parent"
      app:layout_constraintEnd_toEndOf="parent"
      app:layout_constraintStart_toStartOf="parent"
      app:layout_constraintTop_toTopOf="parent"
      />

  <ImageView
      android:id="@+id/target"
      android:layout_width="wrap_content"
      android:layout_height="wrap_content"
      android:background="@color/colorAccent"
      />
</android.support.constraint.motion.MotionLayout>
MotionScene
xml/scene_01.xml
<?xml version="1.0" encoding="utf-8"?>
<MotionScene
    xmlns:android="http://schemas.android.com/apk/res/android"
    xmlns:motion="http://schemas.android.com/apk/res-auto"
    xmlns:tools="http://schemas.android.com/tools">

  <Transition
      motion:constraintSetEnd="@+id/motion_end_setting"
      motion:constraintSetStart="@+id/motion_start_setting"
      motion:duration="1000"
      motion:interpolator="easeInOut"
      >
    <OnClick motion:target="@+id/button"/>
    <OnSwipe
        motion:dragDirection="dragRight"
        motion:touchAnchorId="@id/target"
        motion:touchAnchorSide="bottom"/>
  </Transition>

  <ConstraintSet
      android:id="@+id/motion_start_setting">
    <Constraint
        android:id="@+id/target"
        android:layout_width="100dp"
        android:layout_height="100dp"
        motion:layout_constraintBottom_toBottomOf="parent"
        motion:layout_constraintRight_toRightOf="parent"
        tools:ignore="DuplicateIds"/>
  </ConstraintSet>

  <ConstraintSet
      android:id="@+id/motion_end_setting">
    <Constraint
        android:id="@+id/target"
        android:layout_width="100dp"
        android:layout_height="100dp"
        motion:layout_constraintLeft_toLeftOf="parent"
        motion:layout_constraintTop_toTopOf="parent"
        tools:ignore="DuplicateIds"/>
  </ConstraintSet>
</MotionScene>
参考
勇者を育てるMotionLayout ver0
GoogleI/O 2018で盛り上がりを見せていたConstraintLayoutの2系から入るMotionLayoutについて少しずつサンプルを交えてまとめていこうと思います。
まずはver0ということでMotionLayoutの基本的なところからメモ
公式リファレンス
MotionLayout | Android Developers
公式の紹介記事
Introduction to MotionLayout (part I) – Google Developers – Medium Introduction to MotionLayout (part II) – Google Developers – Medium Introduction to MotionLayout (part III) – Google Developers – Medium
公式のサンプルコード
【メモ】targetSdkVersionとcompileSdkVersion、minSdkVersion
概要
2018年11月からAndroid APIレベル26が既存のアプリでも必須になるということや、直近minSdkVersionを上げる作業を行ったので、改めてそれぞれversion が何を指しているのかを備忘録としてメモしておく。
そして2019年以降は毎年targetSdkVersionをSDKが出た一年以内にターゲットにすることが義務付けられる。
それぞれのversionの意味
| version | 意味 |
|---|---|
| targetSdkVersion | ターゲットとなるSDKのバージョンで、そのSDKのAPIに準拠した動きや見た目になる |
| compileSdkVersion | コンバイル時に使用するAndroid SDKのバージョン |
| minSdkVersion | 対象となるアプリがインストールすることが可能な最低OS(API レベル)バージョン |
一言
当たり前のことなんだけど、SDKのアップデートで何が新しくなったか確認し、早めに対応しておいたほうがいい。
参考
Google PlayのtargetSdkVersion新ルールを整理する | backport
こちらの記事がわかりやすく説明されていたのでありがたかった。
Google Developers Japan: 今後の Google Play でのアプリのセキュリティおよびパフォーマンスの改善について